Want to save space in the bathroom by installing a shower? The bathroom is a place of relaxation, which should be practical and have a nice aesthetic design, right? Do you plan to independently carry out all installation work, but are you confused by installing a shower tray and connecting plumbing?
We will tell you how to cope with this task - the article discusses the important points that you will encounter during installation. And also we paid attention to the features of pallets made of various materials, describing in detail the installation process for each of the options.
To help the novice plumber, we picked up photo materials demonstrating important nuances, and a video detailing the assembly and installation of a compact cabin for receiving shower procedures.
Types of shower trays
Manufacturers are ready to surprise the most sophisticated owner, offering many shapes, sizes and options for shower trays.
One of the first classifications is the separation of models by form. It can be square, oval, round, triangular, rectangular products.
It is worth choosing the shape and size of the pallet, which will distribute the space in the bathroom as ergonomically as possible with the appropriate level of convenience.
Image Gallery
Photo from
Rectangular shower tray
Installation with one adjacent wall
Beveled Pallet
Another classification is related to performance material. Today you can purchase a pallet from:
- cast iron;
- acrylic;
- marble;
- ceramics;
- become.
In this case, the pallet can be installed in different ways: using a metal frame, pedestal or flat surface (for ceramic models).
It is worth noting that marble products are very fragile and can be damaged from a blow at the installation stage, so all work must be done as carefully as possible. A ceramic pallet can also crack from impact.
Image Gallery
Photo from
Cast iron pallets attract with their stability, durability and long-term service. The material perfectly retains the heat imparted to it by jets of water. However, despite the small dimensions, the product is distinguished by its impressive weight, which plumbers pleases little
The steel pallet is lightweight, easy to install, but not stable. For normal operation, he needs a hard metal or brick frame. The material is "noisy" during water intake, it needs to be heat and sound insulated
Plumbing from earthenware is pleasant to the touch, excellently retains heat, does not “ring” how to become when collecting water. But the possibility of damage to the product due to the characteristic fragility makes us look for other solutions.
Acrylic pallets are ahead of all previous offers in terms of sales. Easy to install. They have excellent insulating qualities and affordable price, but they serve no more than 10 years.
Quaril, a mixture of quartz sand with a polymer component, lasts much longer than acrylic. The downside is that so far at a price this option is not available to everyone. In addition, the drain hole will have to be drilled independently at the installation site.
Marble or granite pallets are a very expensive pleasure. Heavy slabs are not easy to install, but it is truly an elitist piece of furniture for an aristocratic bathroom
A practical and more affordable alternative to natural stone is its artificial counterpart - a stone made from crushed granite, sandstone, marble and a polymer binder
The shower tray can be built out of tricks from brick, foam concrete sides or run the sides by pouring concrete into the formwork. These pallets need enhanced waterproofing and tiling, porcelain stoneware, mosaics
Cast-iron shower tray
Greasy shower option
Plumbing earthenware tray
Practical and aesthetic acrylic
Kvarilovy tray for a shower box
Elite natural stone pallet
Plumbing made of artificial stone
Homemade Concrete Pallet
Each manufacturing material has its own characteristics:
- cast iron and steel models May be unpleasantly cold in the morning;
- acrylic warm to the touch, but quite fragile;
- kvarilovye - these are the same acrylic products, but with the addition of quartz dust, due to which the cabin becomes stronger and more durable;
- marble pallets are distinguished by their spectacular appearance and quickly warm up, give a pleasant tactile sensation when in contact with the skin;
- ceramic models slowly heat up, but are practical in everyday use and durable.
Prices for ceramics and stone products are significantly higher compared to other models of shower trays.
Pallets also differ in depth. When choosing, you can use the following guideline: very flat (6-10 cm), medium (10-18 cm), deep (25-35 cm).
The choice of the size of the shower cubicle or tray should be based on the dimensions and configuration of the bathroom.
Image Gallery
Photo from
Siphon for low shower tray
Flat shower tray
Medium height shower tray
High design for collecting water
Pallet Installation Instructions
Installation rules often depend on the material from which the pallet is made, so we will consider four popular options. Acrylic and steel modifications are more common, and cast-iron, marble and ceramic are less common.
The standard cycle of installation and connection of shower trays includes a number of traditional steps:
Image Gallery
Photo from
Stage 1: Marking the position of the pan and drain
Stage 2: Assembling the siphon to connect to the pallet
Stage 3: Billet pipe for connecting to the sewer
Stage 4: Assembling the support devices
Stage 5: Fixing the planks with support legs
Step 6: Marking the top edge of the pallet flange
Step 7: Attach the pan-fixing terminals
Step 8: Verify that the top and bottom of the siphon match
After completing the installation and fixing the pallet, you can safely proceed to the finishing stages of work:
Image Gallery
Photo from
Step 9: Installing the Exterior Parts of the Hydraulic Lock
Stage 10: Securing the decorative edge of the pallet
Step 11: Sealing the Wall Connection Line
Stage 12: Assembling the housing and installing the walls
No. 1 - installation of acrylic models
Acrylic solutions have the smallest weight, affordable price and are sold in a variety of shapes and sizes. Such models are equipped with brackets, legs and other fittings, which helps to carry out installation and fix the pallet on the base.
The lack of design in many cheap models is the lack of reinforcing support under the bottom, so when choosing, you need to pay attention to the fact that the bottom is strengthened.
Step 1. Installation of legs. Depending on the model, the kit can go from 3 to 5 supports.
Some products use a support frame based on plastic or metal. The holes for mounting the legs will be in this frame.
When screwing the supports, it is necessary to ensure that the length of the legs is not less than the height of the siphon. Also, all the supports should be screwed to the same height (then it will be possible to adjust the horizontal position of the pallet using the level)

Make sure that all supports (studs, legs) are screwed in, and after installation, adjust the strictly horizontal position of the pallet
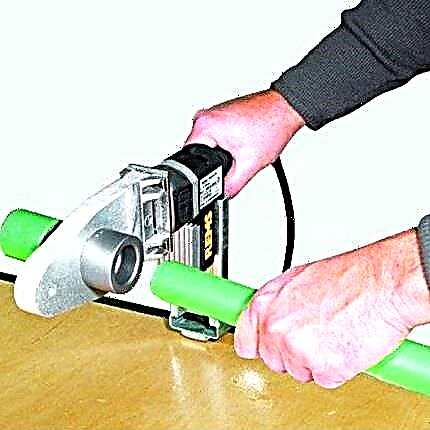
Step 2. Installation of the drain system. It is necessary to connect the pallet to the sewer by placing the product on the rib. A complete sleeve is inserted inside, which is used for connection.
A siphon nozzle is attached to the protruding end of the sleeve. To prevent leaks, the joints are smeared with glue. You can use epoxy glue or epoxy plasticine. Connect the nozzle and the sleeve, and coat the connection with sealant on top.
In some models of shower cabins, a system of connections with paronite or polymer gaskets can be used. In this case, you do not need to use glue. Place the tray on its feet, making sure that the edge of the siphon does not touch the floor.
Step 3. Pallet adjustment. Now it's time to adjust the horizontal structure. To do this, rotate the legs, placing the level on the walls of the pallet (grooves into which the shower enclosure will be mounted).
Horizontal must be checked on all sides of the pallet. If the product is installed against the wall or corner of the room, then it is necessary to lubricate the surfaces in contact with each other with glue and press firmly.
It is necessary to wait until the glue dries, and then tighten the seal with a sealant, applying a layer of it to the place of contact of the sides of the pallet and the wall.

The space under the acrylic tray can be filled with polyurethane foam, which will serve as a support cushion and soundproofing
Step 4. Siphon connection to the drain pipe of the sewer system, installation of a decorative casing, which comes complete with a pallet.
It is recommended to use a shower cabin 6-10 hours after the sealant and adhesive have completely dried.
Image Gallery
Photo from
Support structure for acrylic pallet
Monolithic pedestal for increased stability
Additional brick construction
Use of insulation to facilitate construction
No. 2 - installation of a cast-iron pallet
Installation of a cast iron product is similar to the steps taken with the installation of an acrylic pallet.
The fundamental difference is only in the design of cast-iron models:
- Cast iron is very strong and resistant to metal. There are no reinforcing elements in its design, and the legs are an integral part of the pallet and are cast simultaneously with the body.
- To align such a model horizontally, you will have to lay steel strips under the legs or other objects that will prevent the floor from being forced through, because the cast-iron pallet has considerable weight.
- The sides of the cast iron product do not stick to the wall of the room.
But how to fix the pallet so that it does not move off the plates installed under the supports?
This problem can be solved by cementing the bosses, which will frame each leg, preventing shifts. For formwork, a normal matchbox will come off.
It is worth noting that the complete shower stalls are not equipped with cast-iron trays. Usually they are used with simpler fences, including curtains, screens and other lightweight materials that do not require accuracy, so as not to fit them to the geometry of the pallet.

For cast iron pallets, a full-fledged shower enclosure is rarely used, curtains are usually used. If aesthetic integrity is maintained, curtains are enough
Sometimes the height of the legs of such a product is not enough to place a drain siphon under it. In this case, you have to prepare a special parapet.
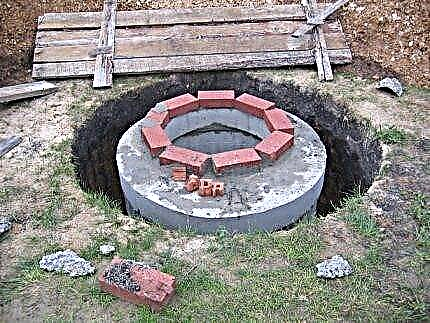
The procedure is not difficult to implement. It is enough to make brick laying around the perimeter of the pallet or to erect a concrete shoulder - this will be the parapet. It should have space for the installation of a siphon and sewer.
Then you need to level the pallet with a level, placing plates under the legs, cementing them with cement lugs. To hide the parapet and the space above it, you can use tiles or mosaic modules.
No. 3 - features of the installation of steel products
Steel models are produced using stamping, so it is quite difficult to make an integral structure from a pallet and legs.
Steel products are equipped with a stand. The factory, which produces steel pallets, also produces the appropriate supports for them.
They have a rectangular or square shape and represent a failure of the welded structure of the profiles in which the threaded bushings are located. Threaded legs are screwed into them, with which you can make the alignment (alignment) of the pallet.
Steel pallets are often included with factory shower enclosures. It is also a reliable option to replace a worn acrylic pallet.
If the pallet is installed as an independent product, then a cement substrate or pedestal is mounted on the bathroom floor. Their height should be sufficient for the location of the siphon and the piping.

The cement pedestal, which is an ordinary aligned screed, allows you to make the installation of a steel or stone pallet as reliable as possible
The contact points of the pallet with the wall can also be glued and sealed, as when installing an acrylic product. The construction of the pedestal will be discussed in the next paragraph.
Details about the assembly and installation of steel models are written in this article.
No. 4 - installation of ceramic and marble models
Today the trend is ceramic and marble plumbing. Shower trays are no exception. Such products are durable and massive, therefore, do not require the use of legs or reinforcing elements.
The installation method is selected depending on the design of the pallet.
Two options are possible:
- Niche Design. Many ceramic models have a niche in the cavity of the pallet for mounting the siphon and draining the sewer system. It is enough to connect such a tray to the sewer and install it directly on the bathroom floor without any additional actions. It remains only to attach the walls of the shower.
- Monolithic option. In this case, to connect the drain hole to the siphon, you will need to erect a pedestal. Inside it will be a space for connecting to the sewer.
The construction of the pedestal is as follows. Apply a layer of waterproofing to the area where the pedestal will be built.
To do this, you can use liquid rubber, roofing material, polyurea, or other composition. It is necessary to wait for the complete polymerization if you have used a liquid product.

As a waterproofing, any modern version of liquid compositions can be used, which after application polymerizes and creates a waterproof layer
Next, create a layer of cement screed with a horizontal surface (use the level). We are waiting for complete drying.
Inside the contour of the pallet, we make brickwork with a height that would be enough for the normal location of the siphon. It is necessary to provide a cavity for drainage.
We connect the drain hole of the pallet with a siphon, the reverse end of which is connected to the outlet pipe. Apply a layer of cement mortar over the masonry.
Next, we install the pallet on the pedestal so that the siphon and outlet are in the places reserved for them. In the end, you need to make the lining of the pallet using tiles.
DIY pallet construction
The process begins with preparing a future place for a shower.
Step 1. To begin with, the installation area is waterproofed, as in the previous paragraph. This will help protect the walls and floor from mold, mildew and dampness.
The process of a pallet device includes the following steps:
Image Gallery
Photo from
Stage 1: Installation and connection of a shower siphon
Stage 2: Construction of the sides and preparation of the bottom for filling
Stage 3: Pouring mortar to the bottom and processing the walls
Stage 5: Tiling the Homemade Pallet
Step 2. Preparing the drain. Ready-made drain assembly can be purchased at a construction or plumbing store. It is also called a shower ladder. It must be of high quality.
The drain hole is immediately connected to the sewer system.The installation must be very tight, so you can use glue and sealants on all threaded connections.

Buying a drain for a homemade pallet, you can not save. Choose a quality product that fits in size will last as long as possible
Step 3. Now you need to lay out the base (use brickwork or rough screed) after the waterproofing composition has dried.
We make the laying of walls using silicate or ordinary brick. Before this, it is necessary to put a metal mesh on the base for solid construction.
Experts recommend laying out the sides with a square, and making the protruding corner beveled. This will prevent injury to the corner and visually expand the space. After 3-4 days, you can proceed to the next stage.
We process the entire base of the pallet with a waterproofing material. After drying, we make a layer of screed over the entire surface of the pallet to hide behind it all the brickwork.
It is important that the screed has a minimum slope towards the drain, so that water does not accumulate after using the shower. After drying, apply the penultimate layer of waterproofing.
Step 4. Leveling the surface of the pallet. To do this, you can use a self-leveling mixture. We apply the final layer of waterproofing and tile the pallet. It can be a mosaic or any other tile.
Tiling or mosaic
In many cases, side facing is required to hide the mounting bases. One of the most convenient options for solving the problem is to use mosaic tiles on a plastic or glass basis.
A glue layer is applied to the base with a notched trowel. After pressing the tiles, excess glue must be removed immediately.
Using the mosaic, you can veneer any uneven surfaces, as it is easily cut with scissors or a knife thanks to the paper base.
It doesn’t matter if you use tiles or mosaics, all seams must be sealed. This especially makes sense when you decide to build the pallet yourself.

The space between the pallet and the floor can be covered with mosaic or tile. Mosaic fragments are flexible and allow you to quickly and efficiently revet the sidewalls or the entire pallet, if you build it yourself
When forming seams, use crosses. After facing, grind the joints with a waterproof grout and a rubber spatula. Then the remnants of the grout are removed and everything is wiped with a piece of cloth. After everything dries, you need to wash the tile.
Reinforcing a steel or acrylic product
These solutions, especially acrylic ones, are not strong enough. Measures to increase strength are reduced to the installation of supporting elements, which may be bricks.

It is important that the pallet presses on all supports with equal force, otherwise one of them can simply push the bottom
At the same time, all the supports in the places of contact with the bottom should repeat its shape. You can also use gaskets made of paronite or rubber.
Some complete shower enclosures have a large height of fencing and tray, for which installation may not be enough ceiling height. In this case, you need to make a recess of the floor in order to install the pallet and connect to the drain.
Use the pallet installation recommendations by watching the video.
How to install a shower cabin:
Installing a shower tray with the right approach does not take much effort and does not require special training. If you follow the instructions, you will get first-class installation of a monolithic pallet with the highest reliability.
Have something to supplement or have questions about installing a shower tray? Share your opinion and leave comments on the publication. The contact form is located in the lower block.