Providing a comfortable microclimate of the bathroom and shower room can be problematic. The increased level of humidity adversely affects cabinets, mirrors and cabinets, contributing to the growth of mold.
If natural ventilation can not cope, then you can put a fan for extracting in the bathroom - the unit forcibly removes the exhausted moist air from the room.
We will tell you how to choose the right model, and also describe the installation process step by step. The installation technology is quite simple, the main thing is to take into account some of the nuances of the connection and follow the instructions below.
Does the bathroom need a fan?
The opinion that manufacturers came up with a bathroom fan to cash in on consumers is not true. After all, living conditions in different houses are radically different. And the operation of the bathroom ventilation system does not always satisfy the needs.
The requests of the residents of the house / apartment vary - someone erases the laundry in the bathroom, likes to bathe for 1-1.5 hours, and someone just takes a 5-minute contrast shower.
All this in conditions of inoperative ventilation is fraught with the appearance of mustiness and other unpleasant surprises in the monastery of purity, for example, the appearance of black mold.

The formation of mold and its active reproduction will lead to an unpleasant odor. Moreover, black spots will appear on the mirrors in the bathroom, and wooden furniture will gradually rot (+)
Installation of a fan will be a salvation for many bathrooms in high-rise buildings and private houses of a modern building with hermetic windows and insulated walls.
A good decision would be to install a fan if the toilet and bath are in the same room. A range hood will add comfort to the life of all tenants who are forced to use the combined bathroom.

Especially relevant are fans for 2-3 bathrooms of a brand new wooden cottage - they will help to prevent mold and rotting of wood.
If the general ventilation works well and excellent draft is observed in the bathroom, and the walls of the room quickly dry after bathing, then you can safely forget about the fan.

If there is a need to install a fan, it is necessary to correctly position the device and the supply air openings or valves to ensure good air circulation in the bathroom
The natural influx and removal of exhaust air is able to fully satisfy the needs of consumers.
Image Gallery
Photo from
Exhaust fan in the bathroom
Ceiling Installation
The principle of operation of the exhaust fan
Location of the ventilation device
How not to miscalculate with a choice?
If you want to buy a fan, the inexperienced owner of the house / apartment can easily get lost among the variety of these appliances.
They all differ visually and in value. The biggest mistake is to choose equipment based on the price that seems most acceptable.
Types of fans and their features
The question of the need for a fan is always solved individually. If a device is needed, then you have to choose the optimal model that can perform its functions of removing exhaust air from the bathroom / shower.

All fans vary in appearance, mounting method, principle of operation and location
By the method of fastening there are:
- waybillsmounted at the entrance to the ventilation duct;
- channelinstalled inside the ducts.
For private use, invoices are used - they are easy to install and are quite capable of meeting the needs of all residents of a country house / cottage. If the house has an extensive network of ducts, the installation of duct fans will be justified.

In rooms with high ceilings and industrial premises, channel models of fans are installed
Depending on the location, such devices are distinguished:
- Wall mounted. They are mounted horizontally - on the wall;
- Ceilinginstalled in the vertical plane.
In private houses, mainly ceiling ventilation devices are installed, which remove the exhaust air first to the non-residential attic, then to the street.
Also, there are paddle and bladeless fans, axial and centrifugal models. The former are most often bought for organizing forced ventilation of the bathroom and shower rooms.
These devices differ not only in appearance, but also in their capabilities. Depending on the skills of the fan, the price differs significantly.
The range is represented by fans from European and domestic manufacturers - Spanish SILENT, italian Elicent, Bulgarian Mmotors JSCRussian "Era", Ukrainian Vents.

The most popular SILENT models, allowing you to choose an option with a mass of additional functions and an incredibly low noise level created by the equipment
Among the features of bathroom fans, the most popular models are those with a temperature and humidity sensor, a timer, a separate power button, safety shutters and a non-return valve.
Another find is an additional decorative panel that allows you to create a unique look of the device, emphasizing the elegant design of the room.

Decorative pads for fans can be made of glass, chromed material, have color illumination and other features that allow you to choose the device for any interior
Rules for choosing a good hood
In order for the device to cope with its obligations to remove exhaust air and please its users, you need to choose the right model. For this, it is important to take into account the important parameters of the future fan, which are crucial for the choice of the final option.
Fan power. The indicator is selected based on the volume of the bathroom / shower room and the diameter of the hole on which the fan will be placed. These are 100, 125 mm and others.
To determine the power, you can use the regulatory requirements, according to which in premises of this type it is necessary to provide air renewal at the level of 3-8 times per hour.
In practice, it turns out that you need the length of the room * by width * by the height of the ceilings * by the multiplicity (from 3 to 8). To the resulting number you need to add 20% - this is a small margin that ensures the free operation of the device.

If the fan will constantly work at the limit, at full capacity, its service life will be significantly reduced. It is better to provide a small margin of power in the amount of 15-20% before buying
Equipment safety. This is an important criterion, because it will be installed in a room with a high level of humidity. And accidental splashing cannot be ruled out. Pay attention to the level of moisture protection.

Therefore, it is important to choose a model that has the appropriate class of protection against moisture.
Fan noise. The most acceptable option is up to 35 dB. The lower this indicator, the more comfortable all family members who use a bath or shower with an installed ventilation device will feel.
If the fan noise is 40 dB or more, this can disturb the sleep of especially sensitive households and cause headaches when they are in a ventilated area for a long time.

Noise has a negative effect on the health and nervous system of an adult. Before buying, you need to check the noise level specified in the instructions
Easy installation and maintenance. Well, if the appropriate option can be installed with your own hands, without calling experienced craftsmen. Yes, and ease of maintenance matters - the simpler and less frequent, the more preferable.
Additional functionality. It is convenient if the fan is equipped with a timer, decorative lighting, protective curtains or a humidity sensor. High-tech models can be controlled via SMS.

For the bathroom and shower, most often they take models either extremely simple or with a lot of additional bells and whistles, so as not to feel discomfort
Cost. No matter how much you want to get the best model, its price always stops. It is on this parameter that the final choice of the consumer depends - someone will focus on Spanish SILENT, and someone will prefer more affordable domestic devices.
Appearance. It is the design of equipment that is appreciated by many consumers who carefully work out the interior of their home. The device should organically fit or add zest to the created style solution of a particular room.
Additional recommendations for selection, and an overview of the best models of exhaust fans are given in this article.
Controversial issues in the selection of equipment
When choosing a fan for bath / shower, you can observe a lot of controversy over additional functions between the owners of the device.
Check valve. You can hear categorically opposing opinions about the necessity / uselessness of this element. It is needed so that the air does not come back.

The role of the non-return valve is difficult to overestimate. The only nuisance is that it needs to be serviced periodically.
For example, if neighbors fry fish / potatoes, then when the fan is off, the valve closes and prevents air with the aromas of a neighbor's dinner from entering the apartment. If the door to the bathroom is tight, then you can refuse to buy a model with a check valve.
This is very individual, because many masters, setting the doors to the bathroom, take into account regulatory requirements and leave a gap from the bottom edge to the floor of 1-2 cm.
Another unpleasant phenomenon is that these valves become clogged and can stick to the fan. They require cleaning and care. Every 6 months you need to remove the fan and brush the check valve petals.
Blinds / Protective Grilles. Often you can hear the opinion that it is advisable to take a model without them. Blinds are needed to close the hole if necessary with one easy movement. This is justified when used by people who like to steam and prone to colds.
When there is no special need for such a function, the constantly closed grille will entail the appearance of stale air in the room, when the fresh cannot be reached, and the exhaust can be difficult to leave.
Safety net. It is needed to prevent cockroaches, butterflies, and other unwanted guests from getting from the ventilation duct.
On the other hand, the grid is electrified, dust settles on it and a web accumulates. Therefore, it is often necessary to clean it - every week or two. To put a protective mesh or not depends entirely on the specific conditions of the bathroom.

If no insects are observed in the private house and gratings are already provided at the ventilation ducts exits, you can refuse such a grid
Decorative panelcompletely covering the direct airflow to the fan. It really affects the performance of the equipment. This point should be considered when choosing a model for your bathroom.
When I liked 2 options that differ in power, noise and price, you can hear advice that you need to take a more powerful one. This is wrong - the power should clearly correspond to the room's needs for updating the air.

A very powerful device will make a lot of noise in a small room and will bring a lot of other troubles to its user in the form of a rapid decrease in temperature, when, after steaming, you can catch a cold
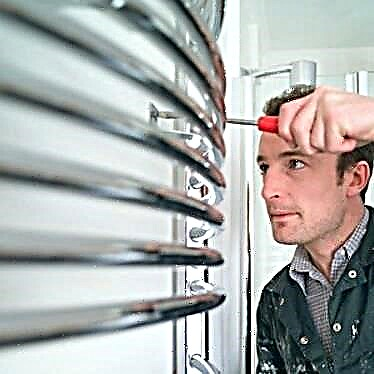
Features of mounting an exhaust fan
You can improve the microclimate of the bathroom with the help of an exhaust fan on your own or with the assistance of craftsmen. The installation option of the ventilation device depends on the complexity of the purchased model and the skills of the owner of the apartment / house.
If the fan is easy to install and there is a desire to do it yourself, then all the work will take about 2 hours with drilling the walls.
The process of installing and connecting the fan to the exhaust outlet in the bathroom includes a number of traditional steps:
Image Gallery
Photo from
Axial fans are installed in the exhaust hole of the bathroom. They are selected in accordance with the cubic capacity of the room and normalized data on air exchange
An exhaust fan is a volatile device that requires power to operate. To connect the fan to power supply a cable to the hole
Through the lower part of the fan housing, to which there are holes for fasteners, mark the points on the wall
At the marked points we drill holes whose diameter corresponds to the size of the dowels
We hammer into the holes of the dowel, attach the lower part of the body to the wall and fix it, twisting the screws into the dowels
We connect the device to the wiring and carefully lay the wires in the groove for them in the housing
After checking the operability of the device, we install on it a front panel with a grill through which air will move
There are no special differences in the installation of the ceiling fan, in addition, from the attic side, a corrugation should be connected to the exhaust outlet and taken to the street
Step 1: Selection and purchase of a fan for hoods
Step 2: Conducting electrical wiring to the exhaust vent
Step 3: Marking the fan mount points
Step 4: Drilling Dowel Holes
Step 5: Attaching the bottom of the chassis
Step 6: Connect the device to power
Step 7: Attaching the Fan Cover
Ceiling fan in the bathroom of a private house
Where to start the installation?
It is desirable to install the exhaust device in the hole previously prepared for it. This is done at the construction / repair stage.
The conditions and technical characteristics of the ventilation duct of a particular bath / shower depend on the type of house, the year of its construction and project. If we are talking about multi-unit housing, then there are ventilation ducts that are in working or completely inoperative state.

To ventilate the bathroom of a country cottage, the owner himself provides for the dimensions of the ventilation channels, their location and other nuances. Or do the experts involved by the homeowner do this
You need to start the installation with the correct preparation of the channel. To do this, the work that is needed in each specific case is carried out - it can be making holes in the tile for access to the ventilation duct or, conversely, adjusting the square section of the inlet to the diameter of the exhaust fan bell.
The ventilation duct can be significantly larger than the fan. But this does not matter - a special pipe for installation is often supplied with the device or you can use a more rigid sewer. It is placed in the ventilation duct, and the hole around is blown with foam.

The option of gluing the fan is impractical - if you need to remove the device for cleaning or repair, it will be extremely difficult to do because of glue
If the craftsmen laid the tile, then it is necessary to mark the diameter of the hole for the fan. You can look in the documentation or simply lean the device against the back and draw a pencil around the outline of its bell. Now you have to make a hole in the tile.
Also, a power cable for connecting the fan must be connected. Ideally, it lies under the tile in the place where the device was originally planned to be installed. If this was not done in advance, then it is necessary to lay it separately on top of the tile, using a special box to protect against splashes.
Features and nuances of installation
Depending on the shape of the fan, the initial parameters of the ventilation duct and the option for fresh air to enter the room, there may be some nuances of the installation.

So, when the hole for the fan is small and there is reverse thrust with the appliance not working, you can make legs for the fan - 1-2 cm
The air will smoothly bypass the fan and get a good stream of air. Feet for the fan can be cut out of polystyrene foam, which can simultaneously perform the function of shock absorption.
If the size of the inlet to the ventilation duct was adjusted to fit the fan bell, then when the mounting foam dries, a couple of the most common rubber bands can be put on the fan bell, as is used in cash desks.

Some models are equipped with rubber bands on the bell, allowing you to securely fix the device in the prepared ventilation duct
This method of fixing will allow you to get a fan if necessary and remove without effort to clean everything. The gum itself acts as a gasket, and is able to dampen vibrations when the device is operating. Another plus - you do not have to drill holes in the wall for mounting.
For large diameter vents, a dual ventilation grill can be used. This is relevant when exhaust air flows through the upper part into the ventilation duct while the fan is running, and free air flows through the lower part.

Double ventilation grille is possible only in some high-rise buildings of the old building
Direct installation of equipment
When the preparation for the installation of the exhaust device in the bathroom / shower room is completed and the place for the fan is provided and marked out, you can start the installation. First you need to remove the upper part of the fan - a decorative panel or grille.
Depending on the chosen mounting option, it is necessary to securely fix the fan.
The most common options are:
- drill holes in the wall;
- to put the fan on liquid nails / glue;
- use 2 gum.
The most correct option is to drill holes for fastening by trying on a fan. Here, before drilling, you need to carefully level the device in level. First, drill the tile using a special feather with a drill or a hammer drill with a drill. Then, punch a hole for the dowel.
Under the wire you need to make a groove or a special hole. The fan itself has a hole for the wires. You need to install the fan in place and pull the wire to the surface.

In the prepared hole for installing the fan, the wire should be on the surface
It remains to fix with screws or other screws. To do this, it is convenient to use a screwdriver or screwdriver.
Now you need to connect the power cable to the fan contacts. For this, the manufacturer's instructions come in handy. Now you need to replace the mesh and the protective grill.

It is advisable to insulate the terminals and wires in order to avoid contact with excessive moisture.
It remains to turn on the fan and check the operation. Moreover, it is most convenient to provide for the location of the switch in the bathroom / shower, and not outside. And it’s not advisable to connect an exhaust fan to a light switch - if you have to wash and brush your teeth, then turning on the device is not required.

It will be practical to choose such an inclusion option so that it is convenient for the user - for example, by programming a timer
The procedure for connecting the hood to a switch or timer model is described here.
Video clip about the organization of bathroom ventilation and the intricacies of installing a fan:
The video details how to properly install an exhaust fan in the bathroom if you have to drill a newly laid tile on the walls:
Install a fan in a simpler way. How to do this is shown step by step in the video clip:
Having familiarized yourself with the features of choosing a fan for the bathroom, you can choose the most suitable option, suitable for the characteristics and cost.
Installation of the device can be done independently. To do this, you need to familiarize yourself with the installation and connection of the device. If such work raises doubts in one's own strengths, then it is better to invite a professional.
If you have experience installing and using an exhaust fan in a bathroom, please share this information with our readers. Leave comments and ask questions in the form below.