Do you want to connect the house to a centralized gas supply? But this welcome event can take a lot of time, effort and money, right? Do you want the gasification of your household to go without any nerves and fines, but don’t know how to act?
We will help you deal with the procedure in order to connect gas to a private house as soon as possible and without problems. The article discusses all stages, from documenting to putting the installed system into operation. Visual photos and informative videos were selected.
Understanding the features of this process will allow you to manage your resources with greater benefit - after all, earthwork can be done on their own. But for the insertion, the participation of a gas service worker with special clearance will be required. Knowledge of the installation features of gas communications will not hurt.
Features of gasification of residential buildings
With the help of gas in the house, it is possible to successfully organize both heating, and heating of hot water, and cooking. Gas equipment is reliable and diverse, and the cost of blue fuel is usually lower than the use of electricity, solid or liquid fuel for the same purpose.
In addition, gas pipelines fail extremely rarely, but power outages are common. The stocks of firewood, coal, diesel fuel and other similar energy carriers have to be constantly replenished.
Image Gallery
Photo from
Gas is the most affordable, economically viable, therefore, a type of fuel that is in demand in everyday life and in production. Gas supplies on the highway are cheaper than in cylinders
Natural gas is a valuable mineral obtained from anaerobic processing of organic substances. Its burning does not harm the environment. In the process, a minimum of burning material is clogged.
Gas supplied from purely gas fields contains a minimum of heavy hydrocarbons. In addition, gas is produced along with oil and condensate, such gas is denser, it is liquid and greasy
In domestic conditions, blue fuel is used mainly in heating systems. Today it is the most rational solution for autonomous communications.
In private houses connected to a centralized gas supply, double-circuit boilers or a tandem of a single-circuit boiler and a water heater are operated
In the houses of the old housing stock, only heating was centralized. For the preparation of hot water, gas columns were installed. To this day, they serve the owners of apartments in houses up to five floors high.
As cooking equipment, gas stoves with gas ovens are still leading in our country, although many regions are already switching to conventional electric and induction equipment options
The most economical types of convectors work on blue fuel - gas models. Many of them can be connected both to the cylinder and to the trunk
Private gas use
Environmental benefits of blue fuel
Pipeline Gas Transportation System
Installation of a boiler room with gas equipment
Double-circuit wall-mounted gas boiler
Geyser in a five-story building
Gas stove in a city apartment
Gas convector in a suburban building
The main problem with natural gas is its danger to human health and its ability to explode. Even a small leak can lead to poisoning or explosion. That is why the requirements for the installation of gas communications are very high, you should not even think about doing all the work yourself.

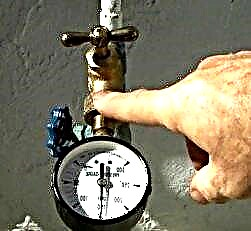
To properly enter gas into a private house, use a special unit called a pressure reducer to lower the gas pressure
For starters, experts do not recommend saving on materials or system elements. Laying pipes of dubious quality and unprofessional installation are unacceptable.
Gas pipes almost always need to be laid in an open way (except for underground sections of the pipeline). They can not be hidden under any decorative elements to improve the interior.

It is not recommended to enter the gas pipe into the house through the thickness of the foundation; for these purposes, make a hole in the outer wall and insert a sleeve into it for protection
It is recommended that you avoid plug connections if possible. All places where the pipes are connected must be located so that at any time the contact point can be inspected and repaired if necessary.
Do not lay gas pipes inside the walls or in the thickness of the foundation. This rule also applies to other elements, such as platbands, door frames, window frames, partitions, etc.
In some cases, it is allowed to lay a gas pipe in a wall niche, but this point should be clearly reflected and justified in the design. Special requirements apply to the slope of the pipes. Horizontal horizontal deviation of the position of the line is only 3 mm in the direction of gas appliances.
Vertically, no deviations are allowed, but the riser may have a slight slope: not more than 2 mm per meter. It must not pass through living quarters, through a toilet or bathroom. The gas riser should be located on the stairwell, often it is carried through the kitchen.
Carefully have to follow the installation of stopcocks. So, the position of the central axis of the tube should be strictly parallel to the wall along which the pipe passes. When choosing the position of the crane, make sure that the position of the locking device is not blocked by the wall. From the ceiling and from the walls the gas pipe should be located at a distance of 100 mm.

Gas pipes are fixed along the wall not close, but at a short distance so that communications remain accessible for routine inspection and repair
The gap between the wall and the pipe can vary from the radius of the pipe to a limit value of 100 mm. This clearance is necessary so that the structure can be freely examined. A distance of 2.2 m should be maintained from the floor. Gas pipes are placed on special durable supports; sagging of the structure is unacceptable.
Therefore, make sure that there are no gaps between the bracket and the pipe. All these important points are taken into account in the design of the gas supply system, which must be previously compiled by specialist engineers.
Gas pipes should be run no less than 30 cm from the electrical panel, and no less than 25 cm from open wiring. At least five centimeters should be retreated from the hidden cable.
Gasification of home ownership step by step
When figuring out how to connect natural gas to a private house, one should take into account the lengthy procedure for processing various documents.
Stage # 1 - Gasification Documentation
First, the owner will have to submit an application with a request for gasification of the house, to which you need to attach documents on the ownership of both the house and the plot, as well as all the available technical documentation regarding these objects.

Before starting the installation of the gas pipeline, specialists draw up the technical specifications and a detailed project of the gas system, which shows all the elements, sizes, distances, etc.
After that, specialists must examine the site and the house in order to draw up a document called technical specifications. At the same stage, it should be clarified whether it is necessary to lay part of the highway through sections of neighbors.
It is better to immediately discuss this point with them, get permission and coordinate the features of the work. In this way, many problems and delays can be avoided.

Through the walls and ceiling, gas pipes are carried out using a protective sleeve and a seal, while only a single piece of pipe can be located inside the sleeve
Based on the technical conditions, a package of design documentation for the gasification of a particular house and land will be drawn up and agreed. Only after that it will be possible to hire a contractor for a range of installation works.
The installation of the external and internal parts of the gas pipeline, its connection to the common highway, the connection of gas equipment and other important stages will be carried out.
In the process you will have to draw up a number of important agreements, such as:
- to conduct research and design specifications for designers;
- on the preparation of project documentation;
- to perform installation work on laying internal and external water supply;
- for the supply of natural gas, etc.
In addition, a number of permits must be obtained. For example, you will need permission to gasify the site from the local architectural office.
And also it is necessary to invite specialists who examine the chimney existing in the house (or arranged specifically for a gas boiler and other gas appliances). The satisfactory condition of the structure is confirmed by the relevant act.
An article devoted entirely to this issue will familiarize you with the cost of connecting a suburban area with a house to a centralized gas supply.
Stage # 2 - supply of the pipeline to the house
Almost all elements, devices and materials that will be used in the gasification process should have quality certificates. For installation of a gas pipeline, it is usually recommended to use pipes made of low alloy or low carbon steel. The diameter of the structure should be 150 mm with a wall thickness of 5 mm.
Non-galvanized steel alloy seamless pipes are allowed. The pipeline is assembled by welding, the quality of which for individual sections of the pipeline should be impeccable. At the points of installation of stop valves, threaded connections are used.
Image Gallery
Photo from
The shortest distance to the connection
Polyethylene pipes in the construction of underground lines
Trenching without forming a pillow
Installation of fittings and control tubes
In addition to steel pipes for the installation of gas pipeline systems in recent years, polyethylene constructions have been increasingly used. They are lighter in weight, they are easier to install, they are good at resisting cold, heat, aggressive chemicals, they do not conduct electric current, etc.
When laying polyethylene pipes in the ground, you can do without additional protective measures, as is done for steel structures. However, plastic is used only for the installation of an external gas pipeline, the entry into the house and the internal system must be metal. Plastic is also not applicable in areas with very severe winters and increased seismic hazard.

Laying an underground gas pipeline is about 60% more expensive than installing a ground gas network, but this installation method is considered safer
For obvious reasons, laying a gas pipeline is more expensive, but if it is done correctly, then such a pipe will be reliably protected from extraneous influence and accidental damage.
Image Gallery
Photo from
Pipe passage at the entrance to the site
Electric pipe welding at the facility
Trenching welded pipes
Horizontal drilling under a transport branch
If the pipe needs to be led across the road, then the contractor will have to block the road and draw up a traffic diagram for detour. The scheme is approved by the local traffic police department, on the basis of which the contractor receives a warrant.
It is recommended to give preference to ground laying of the gas pipeline in areas where the soil has increased corrosion characteristics, but if power lines are located nearby, it is better to give preference to underground utilities.
Image Gallery
Photo from
Overhead gas communications
Box for gas equipment
Overhead gas pipeline painted yellow
Both types of laying can be combined in one section, for example, through the road to hold a gas pipeline underground, through the territory of the neighbors section - above the ground, etc.

It is not always possible to lay a gas pipe underground; when installing an external gas pipeline, special safety measures should be taken into account, taking into account the influence of external factors
After the project is ready, you can proceed directly to the installation work. Of course, they will be carried out by specialists who have the necessary training and equipment.
Stage # 3 - arrangement of the boiler room
But even before the gas pipeline is laid, it is recommended to take care of the rooms where gas appliances will be installed: a gas floor boiler or wall speaker, stove, etc.
Both the boiler room and the kitchen should have a window that can be opened at any time for ventilation. The opening area should be at least half a square meter. The height of the ceilings should be at least 220 cm. Doors should be made opening not inward but outward.

Gas boilers with a capacity of less than 30 kW can be installed directly in the house, having allocated a separate room for these purposes, but for more powerful devices you will need a separate boiler room
Please note that the number of burners on a gas stove depends on the size of the kitchen. So, in a room with an area of less than eight square meters, it is allowed to install only stoves with two rings, for a stove for three rings, at least 12 square meters are required. m, for a four-burner device - at least 15 square meters. m etc.
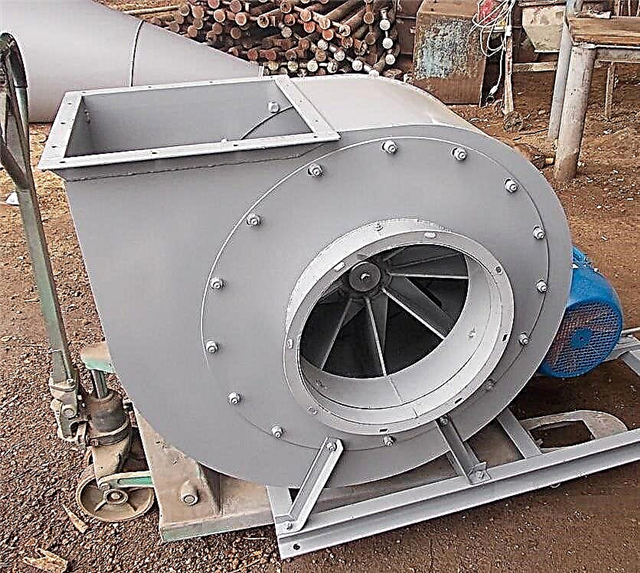
If the boiler power exceeds 30 kW, you will need to build a boiler room for it, located at some distance from the house. It should provide good forced ventilation, walls, floors and ceilings should be decorated with fire-resistant materials.
Do not use the boiler room as a storage room, the presence of foreign objects and materials can cause an accident.

Serious requirements are made to the location of the chimney of the gas boiler, which take into account the characteristics of the material of the walls of the boiler room and its roof. Legend: d - diameter of the chimney at the boiler, D - diameter of the chimney on the street
Water must be brought to the boiler room, which is located in the house, as well as a sensor for determining the level of carbon monoxide in the air. It is recommended to install an alarm system that shuts off the gas supply in the event of a leak. Do not install more than two low power boilers in one boiler room.
For a 30 kW device, a room of at least three cubic meters is required, for boilers of high power, more than 60 kW, at least 11.5 cubic meters are needed. m of space. People should not be in the boiler room for more than four hours a day.
Image Gallery
Photo from
Laying gas pipes on hard surfaces
The distance between communications and the gas pipeline
Indentation from the mains and gas pipes
Open pipe laying
The floor, walls and ceiling in the boiler room must be not only resistant to fire, but also not producing dust. Dirt often causes breakdowns in gas equipment.
A prerequisite for connecting to the main gas supply is the installation of a gas meter. The article recommended by us will familiarize you with the rules for choosing a gas flow meter and the specifics of its installation.
Stage # 4 - entering communications into the house
In order to correctly introduce gas into the house during the installation of its own gas supply system, a hole is made in the lower part of one of the external walls, but not in the thickness of the foundation.
First, an insert in the form of a steel sleeve is inserted into the hole, and then a pipe is inserted through it into the house. The main riser and the internal gas pipeline are then connected to it.

The gas pipe is inserted into the main line by the gas service. This is followed by the first start of gas, checking for leaks, setting up gas equipment, etc.
The riser is usually placed vertically, retreating from the wall by 15 cm and securing it with special hooks to fix the vertical position. The pipe is installed under a slight slope to it.
All places where gas pipes pass through walls deserve special attention. The holes must be made large enough, because they also need to put in protective sleeves through which the pipes are led.
Previously, all sections of communications that will be in the wall should be covered with several layers of oil paint. The gap between the surface of the pipe and the sleeve should be laid with a layer of tow soaked in resin, and also filled with a layer of bitumen.
In this case, you need to make sure that there are no places in the wall that are connected by welding or thread. In the thickness of the wall can be only one piece pipe.

Inside the house, only metal gas pipes can be laid. High requirements are imposed on the position of structures vertically and horizontally
The fewer connections in the gas pipeline, the more sections of solid pipes, the better for the safety of the structure. In order not to cut the structure, when it needs to be bent and change direction, it is allowed to heat the area with a gas burner, but this method should not be abused.
Separate parts of the gas pipeline are connected on the ground, then pipes are installed along the walls, connected, fixed with special brackets. Narrow pipes, less than 40 mm in diameter, can be fixed to the wall using clamps or special brackets.
Thicker structures are suspended on brackets, as mentioned above. In any case, you need to firmly fix such fasteners in the wall with concrete mortar and wooden corks.

Narrow gas pipes can be fixed to the wall using special fittings. It is important that these elements are firmly fixed in the thickness of the wall.
Welding gas pipes is a special art. To make the seam really smooth and durable, it is necessary to carefully prepare the joined surfaces. The edges of the communications should be cut, aligned and smoothed by one centimeter. Only then can welding be started. High quality electrodes are recommended.

For the installation of gas pipelines, in addition to pipes, many auxiliary elements are used. All must be of high quality, certified
Threaded connections should be made as small as possible. They must be carefully sealed to eliminate any risk of gas leakage. First, the thread is treated with whitewash, then a sealant is wound on it (linen thread, FUM tape, etc.), only then screw the connection.
Stage # 5 - test run and final events
After assembling the system and introducing gas into a private house, you will have to go through a number of final activities. Before starting and setting up the equipment, home owners must undergo safety training. To lay the internal and external gas pipelines, you can invite either one contractor or two different ones if you wish.
It can be both specialists of the local gas organization, and third-party organizations that have the appropriate licenses. But a direct connection to the main gas pipeline should be provided by a separate insert service.
After this, the first start-up of gas is carried out in the system and a check is made for leaks. This service is paid separately. By this time, an agreement for the maintenance of existing gas equipment should already be concluded.
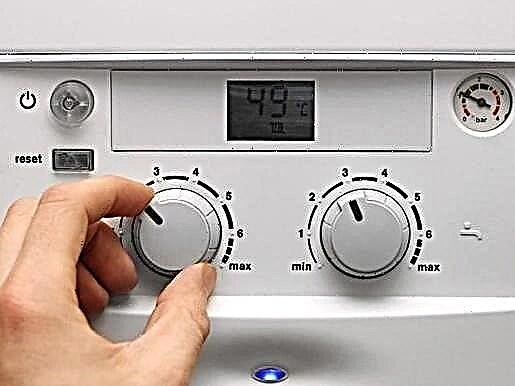
After the first start-up of gas, the specialist of the service company must carry out the adjustment of such equipment, this is an important point on which the validity of warranty obligations depends.
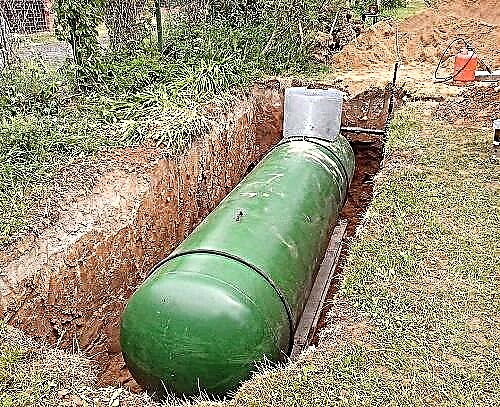
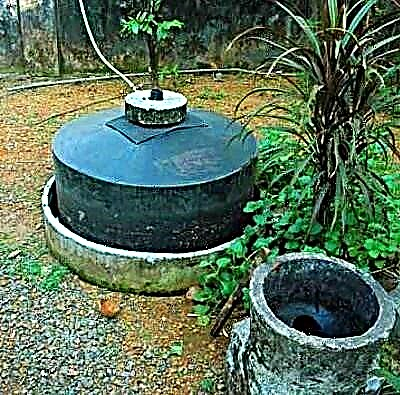
If for some good reason connection to the gas main system is not yet possible, pay attention to the option of installing a gas tank. It is possible that at the moment this method of organizing the supply of gas to the house for you personally will be more attractive.
Detailed information on the gasification of a private house is presented in this video:
It contains practical tips to help you avoid common mistakes in the gas installation process:
Gasification of any facility is a job for professionals with the appropriate skills and licenses. The owner of the site has the obligation to draw up the necessary documents, select a contractor, etc..
The whole procedure is usually costly, but the result is worth the money and effort.
Please write comments, ask questions, post photos on the topic in the block below. Tell us about how you connected your site to a centralized gas supply. It is possible that your experience will be useful to site visitors who have to go a similar path.